Unbrick LG LD, LH series TV sets

If you made a bad firmware upgrade for some LG TV series, you could recover the TV with a few steps…from a  RS232 – serial console!

What you will need:

  • Hyperterminal. If you have Windows XP, you probably already have this. However, the trial version will do;
  • A serial port on your computer.
  • A Null modem cable. If you don’t have one laying around, you could make one.

So, here is what you will need:

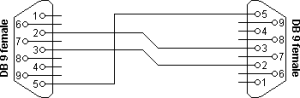
-Two DB9 female connectors;
-A disposable USB cable with reasonable length (I found a 2 meters long one); Also, any 3 wired cable will do;
-A soldering iron for making connections;
-A steady hand.

Here is how you must wire the whole thing:

db9nulldumb_0_o

You will also need a good firmware version. You can download a good firmware for your LG Tv model, from the LG site.
Optional: A good UPS, to avoid any data loss.
Now, if you have all of that, do EXACTLY this way:

  1. Turn OFF your TV;
  2. Connect the cable on PC and on your TV;
  3. Start Hyperterminal;
  4. On the „New connection name” window just enter LG. You can use any name here, it is not important at all;
  5. On the „Connect To” window select the port you are using (I use COM1) then click on „Configure”;
  6. In the „Configure” window select:

Bit rate per second: 115200;
Data bits: 8;
Parity: none;
Stop bits: 1;
Flow Control: none.

7. Hit „Apply” then „Ok” twice.
Right now, „Hyperterminal” will wait for incoming connections. So… Let’s connect the TV!
1. Turn ON the TV and press ESC key several times. If everything goes fine, you will see „Mstar #” prompt after 5-10 seconds;
If you are lucky enough to see that prompt, type swuz then hit Enter key (you will see some HEX numbers);
2. Go to Transfer->Send file menu;
3. On „Filename” box select the correct firmware and on „Protocol” box select „Zmodem” (not „Zmodem with Crash Recovery”);
4. Hit „SEND” button and wait without touching ANYTHING else. Basically, just leave your computer for 30 min or so!

You need to wait for about 30 minutes or so for the file to be transferred. If everything goes fine, you will see a very fast-scrolling screen with EPROM informations. You don’t need to know those, but after few seconds you will see the prompt again.

Don’t do anything else than turn off your TV, unplug the serial cable, turn it back on, and all should be working with no problem!

PS:You may have to try several times to succeed the transfer. I noticed that the transfer is stuck when the monitor goes to sleep, so you better disable monitor standby. Also, don’t do anything else on your computer. If you also get stuck with transfer, just turn off your TV and carefully re-do all steps above.


Good Luck!

#32ld320, #ld-series, #lg, #lh-series, #service, #tv, #unbrick

Upgrade TP-Link WR1043ND v2 to v3 + Unbrick TP-Link WR1043ND v2

WARNING! By folowing this tutorial , you could easily BRICK your router. I shall not to be held responsible if YOU brick your router.

Flashing

Things that you will need:

a). TP-Link’s official firmware for V3 with U-Boot included.
b). a U-Boot stripped {WITHOUT U-Boot} file for this same firmware.
c). Gargoyle 1.6.2 firmware image for WR1043ND V2.
d). Winscp.exe for scp access to router’s RAM /tmp directory.
e). Putty.exe to gain SSH access to Gargoyle router.

You will found the above files in this archive: TP-Link WR1043ND v2 to v3 Upgrade.7z . Extract with 7-Zip

The process that finally worked for me.

1). Flash V2 hardware with Gargoyle 1.6.2 through webpage/GUI interface.

2). Enable SSH access to Gargoyle router.

System -> Router Access > Enable Remote SSH Access

3). Use winscp to copy “U-Boot stripped” TP-Link firmware file (v3_stripped.bin) to ram directory i.e. /tmp

4). Use putty to SSH into router, go to /tmp directory & force flash this stripped TP-Link firmware file to router’s ROM. [Hence bypassing any TP-Link firmware upgrade security checks]

cd ..
cd tmp
mtd -r write v3_stripped.bin firmware

5). After reboot login to your TP-Link V3 firmware with default login/pass (admin/admin), go to firmware update page & now flash the original/complete/official TP-Link V3 firmware WITH U-Boot file (wr1043ndv3_en_3_16_9_up_boot(150514).bin).

6). After final reboot For all intents and purposes, now you have a fully working TP-Link WR1043ND V3 Router.

7). Please note as of yet the V3 firmware WILL NOT allow you to flash Gargoyle WR1043ND V2 file from its web interface. Hopefully this will be fixed once Official Gargoyle WR1043ND V3 image is released.

Work around: I used TP-Link’s tftp emergency firmware recovery mode to flash this Gargoyle WR1043ND V2 image.

PS: In-case you stop or get stuck after step 4), pls. do remember that at this stage you are running V3 firmware over V2’s U-Boot layer, hence for the official tftp emergency firmware recovery method to work, you will have to use “wr1043v2_tp_recovery.bin” as firmware image file name instead of “wr1043v3_tp_recovery.bin”

I hope this long description helps. Good Luck.

How to UNBRiCK if anything goes wrong… or you want to downgrade to v2

Things that you will need:

a). TP-Link’s official recovery firmware for V2
b). Tftpd32 v4.50 software
c). Working LAN card

You will found the above files in this archive: Unbrick WR1043ND v2.7z . Extract with 7-Zip

1). Set your network card to the following IP address: 192.168.0.66, and subnet mask to 255.255.255.0

2). Install Tftpd version 4.50

3). Open Tftpd, and browse to where your recovery firmware (wr1043v2_tp_recovery.bin) is.

Hit show dir button to make sure that your recovery file is listed.

4). Select from the dropdown box, your network card, where is showing 192.168.0.66

5). While powered off, connect your router to your network card thru a network cable (provided with the router at purchase)

6). Press and hold the RESET button on your router, and power it on. After 3-4 seconds, the firmware will upload to the router

If you change to the Log Viewer TAB, you’ll see that the file was uploaded succesfully to the router.

7). The router will reboot, and you will be able to log in to the web interface  – http://192.168.0.1

You have successfully UNBRICKED yout TP-Link WR1043ND v2 router!

#1043nd-v2, #1043nd-v3, #tftpd, #tp-link, #unbrick, #wr1043nd